
Part 4 - Setting up Travis-CI for automating deployment (2020)
This article is a part of a series of articles for web development using pelican. So, if you haven’t read the previous articles, please check it out by clicking the links below.
Creating and deploying static websites using Markdown and the Python library Pelican
- Part 1: Setting up Pelican - Installation and Theme
- Part 2: Writing content using Markdown
- Part 3: Hosting your website to GitHub Pages and custom domain
Up to this point, you have created and hosted your static website on GitHub pages and custom domain as well.
Now, let’s learn to automate the process of pushing to source and deploying to the master branch by using continuous integration tools like Travis-CI so that you don’t need to manually push to two branches every time you update your site.
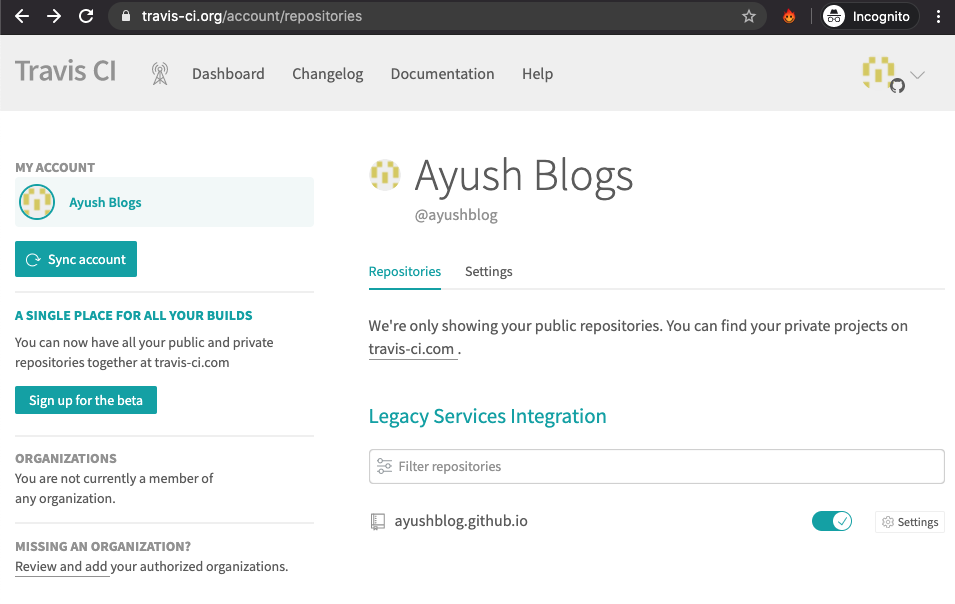
First, visit Travis-CI and log in using your GitHub account.
Then, add your repository
yourusername.github.ioin the Repositories section as shown below.
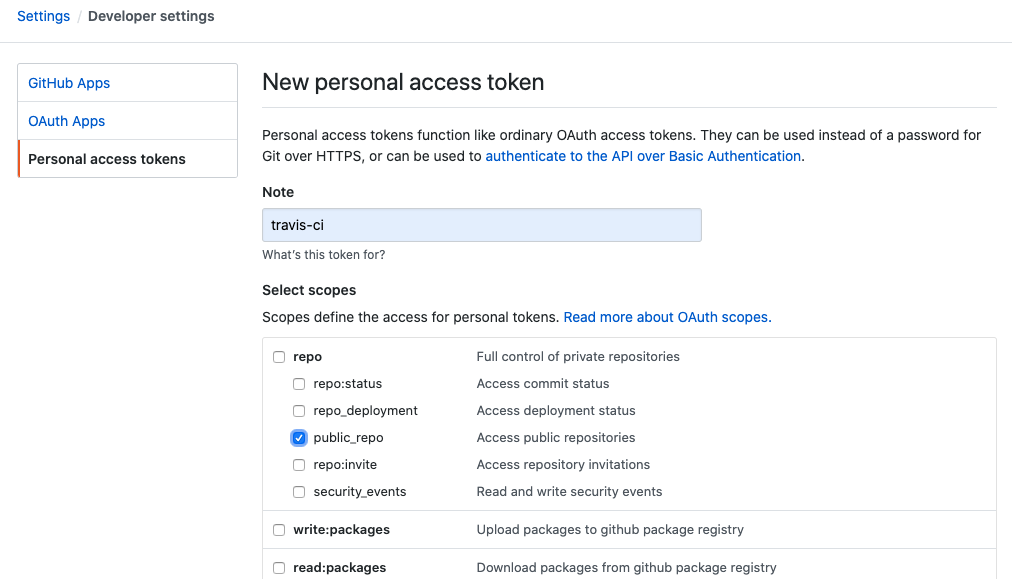
Now, we need to generate Personal access tokens in GitHub. Go to Generate new token for Github
Check the
public_repocheckbox and clickGenerate Tokenas shown below.
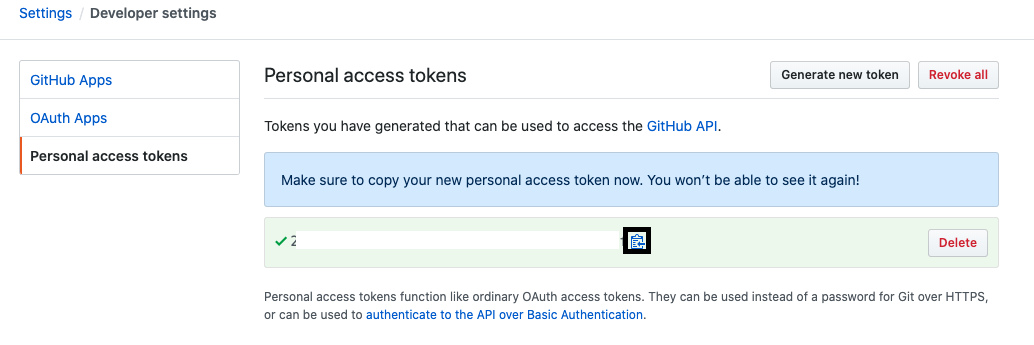
- Copy the generated token by clicking the copy button as shown below. Note that you cannot view this token again if you don’t copy.
Go back to Travis-CI Repository and open settings. Add the following environment variables as shown in the gif:
- GH_TOKEN Paste the value of access token you copied
- TRAVIS_REPO_SLUG
username/username.github.io
- Now, open
fabfile.pyand delete the publish function along with the wrapper@hosts(production)and replace it by the following lines:
# @hosts(production) > Removed
def publish(commit_message):
    """Automatic deploy  to GitHub Pages"""
    env.msg = commit_message
    env.GH_TOKEN = os.getenv('GH_TOKEN')
    env.TRAVIS_REPO_SLUG = os.getenv('TRAVIS_REPO_SLUG')
    clean()
    local('pelican -s publishconf.py')
    with hide('running', 'stdout', 'stderr'):
        local("ghp-import -m '{msg}' -b {github_pages_branch} {deploy_path}".format(**env))
        local("git push -fq https://{GH_TOKEN}@github.com/{TRAVIS_REPO_SLUG}.git {github_pages_branch}".format(**env))
- Now, create a
.travis.ymlconfiguration file in the root directory for automatic deployment.
(.venv) $ touch .travis.yml
Add the following lines in it.
language: python
cache: pip
branches:
  only:
    - source
python:
  - 3.5
install:
  - gem install sass
  - pip install -r requirements.txt
  - git config --global user.email "your-github-email"
  - git config --global user.name "your-github-name"
  - git clone https://github.com/alexandrevicenzi/Flex.git themes/Flex
  - git clone https://github.com/getpelican/pelican-plugins

script:
  - fab publish:"Build site"
The above file is responsible for testing every pushed source code and also for automatic deployment of the output folder contents (HTML) to the master branch. Change the theme repository in the above file if you are using a different theme.
- The final step is to add the following line to the top of your
README.mdfile.
# Personal Blog [](https://travis-ci.org/username/username.github.io)
Note that you must replace username by your username in the above line. The above line adds the build status (passed or failed) in your repository as shown below.

You can click the build button to view the build status in Travis-CI in detail. You can view why the build failed in detail if the build failed and hence make the necessary corrections in the source code.
If the build fails, the new contents are not pushed to the master branch and hence your website won’t be updated by failed content caused by an error in the source code. This enables your website to run without errors at all times.
Hence, after a successful configuration, every time you update your source code and push to the source branch, automatic testing occurs and the website’s HTML files are pushed to the master branch.
Learn to integrate Disqus comments and Google Analytics in your website in the part 5 of the article.
If you have any confusion in any article, feel free to comment on your queries. I will be more than happy to help. I am also open to suggestions and feedbacks.
Also, you can use my GitHub repository for my blog post: ayushkumarshah.github.io as a reference in any point of the article. I have followed the same steps mentioned in this series to create my blog website that you are seeing right now.
If you want to visit any specific parts of the article, you can do so from the links below.
- Part 1: Setting up Pelican - Installation and Theme
- Part 2: Writing content using Markdown
- Part 3: Hosting your website to GitHub Pages and custom domain
- Part 4: Setting up Travis-CI for automating deployment
- Part 5: Integrate Disqus comments and Google Analytics with Pelican
Or, go to the home-page of the article.